Traditional social media accounts have become rather clinical in their design; now that everyone’s profile looks exactly the same, we’ve long forgotten the days of fully customisable internet landing pages; gone are the days of Angelfire and Geocities sites or your MySpace page.
Where you could make your profile a beautiful eye sore that only you could love. Nostr clients might not offer that level of customisability, but there is a range of new features coming that can give your profile something unique to showcase.
Badges are customised pieces of digital art that can be shared on a user’s Nostr profile page. A badge is issued by a creator, and only they have the means to edit and award this badge, while anyone who is added to a badge list can claim and display a badge using their public key. This allows any user to create a badge, and any user can claim and display a badge.
Adding badges will make your profile more discoverable and interesting and enable other users to easily identify what kinds of things are important or relevant to you.
While badge creators can curate members and build a community around their emblem of choice, be it Lightning Node runners, ASIC miners, regenerative farmers, or fans of Orange Is the New Black.
Need a little help getting started?
If you like the idea of badges, and you’re looking to add a bit of personality to your Nostr account or create a community of your own? With the simple process of creating and sharing badges, now you can!
Take a look at our detailed guide on how to create badges for your Nostr account.
And don’t worry if you’ve never made your own badge before – we’ll take you step-by-step through the process! By following this guide, novice users will learn everything they need in order to create and share badges quickly and easily.
So let’s get started!
Creating a badge.
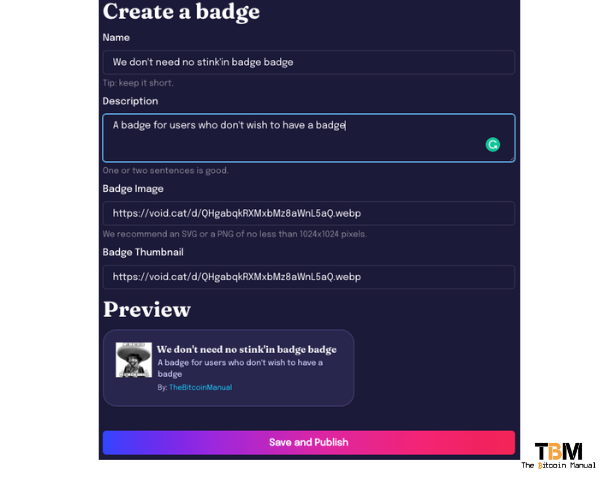
To create a badge, you can use a badge creation client, like Badges.page, this is one of the first clients to offer the experience, but more should spring up over time.
- Head to badges.page
- Sign in with your nostr key
- Click Create
- Give your badge a name
- Describe your badge
- Provide an image URL – 1024×1024
- Provide a thumbnail URL – 512×512 (xl), 256×256 (l), 64×64 (m), 32×32 (s) and 16×16 (xs)
- You should see a review of your badge below.
- If you’re happy with the badge, click save and publish, then sign with your nostr key.
Note: If you’re not a photoshop user, try using a service like Canva to create an image template for the preferred size and paste your image into the template and resize and save it accordingly. Once you have the image, you can upload it to any file-sharing site, your own site, or use a nostr client that supports file uploads.
Upload the file, grab the image URL path and then return to the badge creation page and paste your badge and thumbnail image paths.
View and edit a badge.
Once you’ve created your badge, it should display in your profile under the created section, where you will see the following:
- Badge image.
- Badge title.
- Badge description.
- Creation date.
- The user who created the badge.
- Amount of users you awarded the badge to.
Your badge should have a unique event ID that looks something like this:
naddr1qq3hwefdv3hkuapddejk2epddehj6um5d9hxk6tw943xzer8v5kkyctyvajsygr7e5l7vdf7cnznvune86q5ghp2xxwv7z3f32gaw7kulguxk5hnp5psgqqqw5usv94m0r
Note: If you’re unhappy with the badge and would like to make changes, you can always click the edit button and fix any spelling errors, update the image or change the title and description. You will then need to sign with your nostr key to push live all your changes.
Awarding a badge.
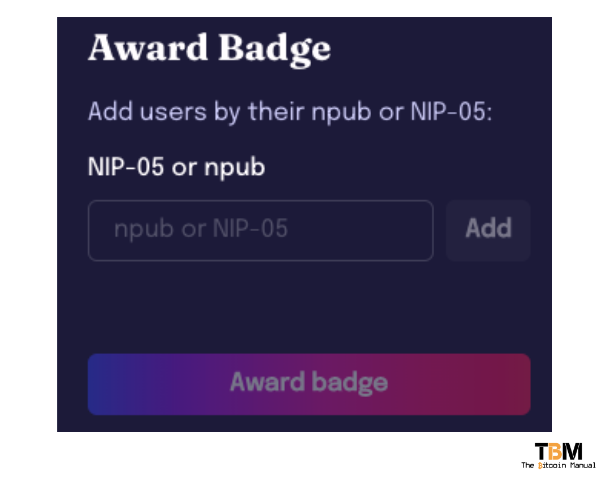
Now that you’ve created a badge, it’s time to award it to worthy members of the community. You can choose to be exclusive and only add users based on their unique public key (npub), or you can apply the spray and pray approach and assign it to any user of a certain NIP-05 ID.
For most badge creators, the npub option would be the preferred option.
It would only be relays, lightning wallets or NIP registration services that would offer a badge based on such a wide selection of users.
To add a user to your badge list, you need to
- Search out the user npub key on a nostr client
- Paste it into the award badge field
- Click add
- Sign with your nostr key
Once signed and broadcast, the user of that npub would need to log in to clients that support badges, where they will automatically receive a prompt that they can claim their badge.
Receiving a badge.
If you’ve been awarded a badge and want to claim it or check up on the status of your badge, you will need to log in to a client that supports badge management.
- Login to the badge management client with your Nostr key.
- Navigate to your profile if it doesn’t automatically take you there.
- Select the awarded tab.
- Review the badges you’ve been issued.
- If you want the badge, click accept; if not, reject it.
- Sign your decision with your Nostr key, and you’re done.
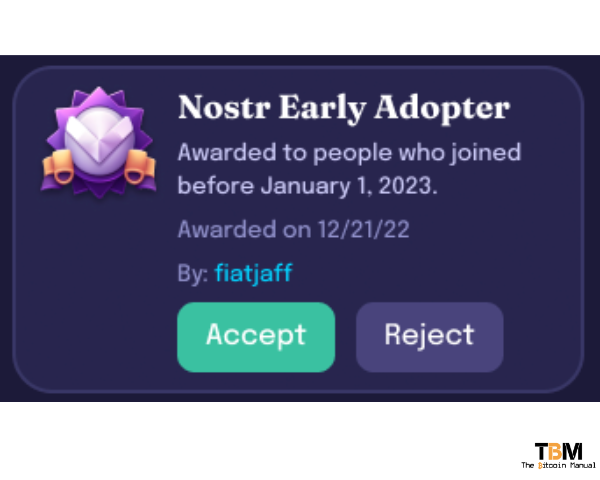

A little note on badges.
Since badges can be created by anyone and awarded to anyone, it’s up to you to curate your badge list and ensure you only display badges from communities and people you trust. Spammers could create badges and submit large lists of public keys to get you to sign up, thinking it’s a certain community, only to rebrand that badge later.
Scammers could also create fake badges and try to get you to pay to be part of certain communities only to leave you with a useless badge that no one subscribes to, so do some research if you start getting DM’s about badges and badge buying.
Users could also build badge communities and then sell their key to another user, and you might be associated with groups you didn’t agree to in the beginning.
Finally, since a badge is tied to an issuer account key, if that user loses that key, the person who hacks that account will now have control over that badge and can change it to anything they would like, so if you are planning to issue badges, then its best you keep that Nostr private key safe.
As people discover badges and undoubtedly abuse them, it will be up to you to curate the badge lists you wish to be on and reject any badges that don’t fit your standard.
Do your own research.
If you’d like to try out Nostr or want to learn more about it, we recommend checking out the following resources to kickstart your research.
Are you on Nostr?
If you are a Nostr user and want to hang out and chat with us or follow our content on your preferred Nostr front end, feel free to add us using our PubKey below.
npub10mxnle348mzv2dnj0ylgz3zu9gceenc29x9fr4m6mnars66j7vxsnkn8mj
The Bitcoin Manual’s Nostr Pubkey
Do you want a “no-stinkin’ badge” badge? Drop your npub in the comments below or DM us or Zap on nostr, and we’ll happily award you one.
Please give us your notes.
If you have used Nostr, which client do you prefer and why? How do you find Nostr followers? Are you excited about badges? What would the first badge you’d like to see?
Let us know in the comments down below.

